
5 Steps to Tarp a Roof: How to Prevent Storm Damage
04.24.26
6 Minute Read
How to tarp a roof is an important skill for homeowners dealing with storm damage or sudden leaks. A properly secured temporary roof tarp can help prevent further water infiltration, protect your roof deck, and buy you time until permanent repairs or a new roof can be completed. Acting quickly after heavy rain or high winds can make a major difference in limiting damage to your house and avoiding more expensive repairs later.
- When to tarp: After visible roof damage or active leaks
- Goal: Prevent additional water infiltration
- Best conditions: Install on a dry, stable surface
- Temporary fix: Not a long-term solution
When You Should Tarp Your Roof

Roof tarping is typically needed after severe weather causes visible roof damage or active leaks. If your roof has missing shingles, exposed underlayment, or holes where water is entering, a tarp can act as a temporary barrier.
Tarping is especially important if more rain or high winds are expected. Even small openings can allow water to spread across your roof deck and into your home, leading to larger structural issues.
Materials for a Roof Tarp
Choosing the right tarp and materials is critical to ensure your temporary roof tarp holds up against rain and high winds. Lower-quality materials can fail quickly, leading to more water infiltration and additional roof damage.
- Heavy-duty tarp: Use a thick polyethylene or reinforced tarp that is waterproof and tear-resistant
- Proper size tarp: Large enough to extend several feet beyond the damaged area for full coverage
- Add extra overlap: When measuring, include at least 4 feet of overlap on all sides of the damaged area to ensure proper coverage and secure fastening
- UV-resistant material: Helps the tarp last longer if exposed to sunlight
- Reinforced edges or grommets: Prevent tearing when securing the tarp
- Wood strips or boards: Used to anchor the tarp securely to the roof deck
- Roofing nails or screws: Ensure a tight hold, especially in high winds
Using durable, weather-resistant materials helps create a stronger seal and gives your home better protection until permanent repairs can be completed.
5 Steps to Tarp a Roof the Right Way
Tarping a roof requires proper placement and secure installation to protect your home from further damage.
1. Assess the Damage Safely
Start by evaluating the roof from the ground if possible. Look for missing shingles, exposed areas, or visible holes where water may be entering.
- Check conditions: Never climb onto a wet or unstable roof
- Identify entry points: Focus on damaged sections
- Use caution: Call a professional if the roof is unsafe
2. Clear the Damaged Area
Before placing the tarp, remove debris to create a flat and stable surface.
- Remove loose shingles: Clear broken materials
- Clean debris: Eliminate dirt, branches, or buildup
- Inspect the roof deck: Ensure the surface is solid
3. Position the Tarp
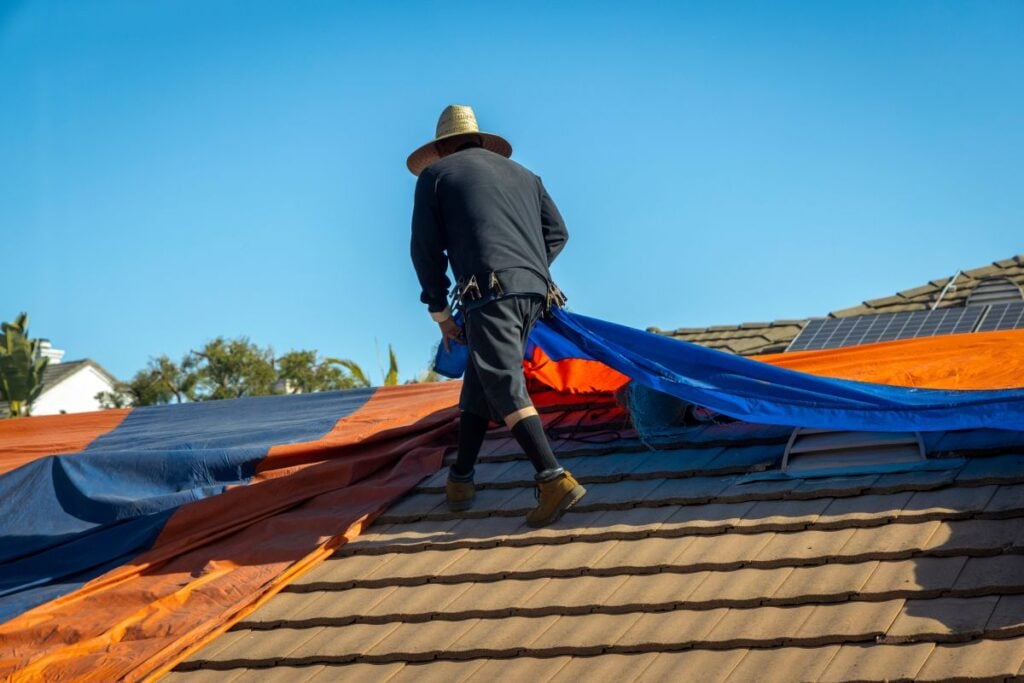
Lay the tarp over the damaged section, making sure it fully covers the problem area.
- Extend coverage: Go several feet beyond the damage
- Go over the ridge if possible: Prevent water from getting underneath
- Center the tarp: Ensure full protection
4. Secure the Tarp Properly
Correctly securing the tarp is critical to prevent it from lifting, tearing, or allowing water underneath.
- Use wood strips: Nail boards over tarp edges for stability
- Anchor into the roof deck: Do not rely only on shingles
- Use enough nails or screws: Space them evenly for a tight hold
- Seal all edges: Prevent gaps where water can enter
- Wrap edges when possible: Reduce wind uplift
5. Tighten and Monitor the Tarp
Once installed, check that the tarp is tight and continues to protect your roof.
- Pull tight: Prevent sagging and water pooling
- Check after storms: Ensure it holds during high winds
- Watch for movement: Re-secure loose areas
- Plan repairs: Schedule a permanent fix as soon as possible
How to Secure a Roof Tarp Properly
Properly securing a temporary roof tarp is what determines whether it actually protects your home or fails during the next storm. A loose tarp can allow water infiltration, worsen roof damage, or tear off in high winds.
- Extend beyond the damage: Always lay the tarp several feet past the damaged area
- Anchor into the roof deck: Fasten through the tarp into solid structure
- Use wood strips for reinforcement: Distribute pressure and prevent tearing
- Pull the tarp tight: Eliminate slack to avoid pooling water
- Seal all edges: Close off any gaps where water can enter
- Use roofing tape or cement: Seal seams and cover exposed nail heads for added waterproofing, especially when using multiple tarps
- Secure against wind uplift: Fasten edges tightly to resist high winds
- Space fasteners evenly: Keep the tarp firmly in place
- Inspect after storms: Recheck and adjust as needed
Taking the time to secure the tarp correctly helps create a reliable temporary barrier and minimizes further damage.
Safety Precautions When Tarping a Roof
Working on a roof can be dangerous, especially after storm damage. Taking the right precautions helps reduce the risk of injury.
Use Proper Safety Equipment
Always wear proper safety equipment, including gloves, non-slip shoes, and a safety harness if your roof is steep or elevated.
Avoid Unsafe Conditions
Never attempt to tarp a roof during rain, strong winds, or icy conditions. Wet surfaces increase the risk of slipping.
Work With a Partner
Have someone assist you when possible. They can stabilize the ladder and help monitor safety.
Know Your Limits
If the roof is too steep, heavily damaged, or difficult to access, it is best to call a professional.
When to Call a Roofing Professional
While tarping can help in an emergency, it is not a substitute for proper repairs.
- Large or widespread roof damage
- Structural concerns or sagging areas
- Recurring leaks after temporary fixes
- Difficult or unsafe roof access
A roofing professional can inspect the damage and determine whether repairs or a new roof is the best long-term solution.
Community Pro Roofing: Fast Help When You Need It Most
Storm damage can happen quickly, but acting fast can protect your home from more serious problems. At Community Pro Roofing, we help homeowners secure their roofs, assess damage, and complete repairs the right way.
If you need help installing a temporary roof tarp or scheduling a repair, contact us today to get expert guidance and protect your home from further damage.
